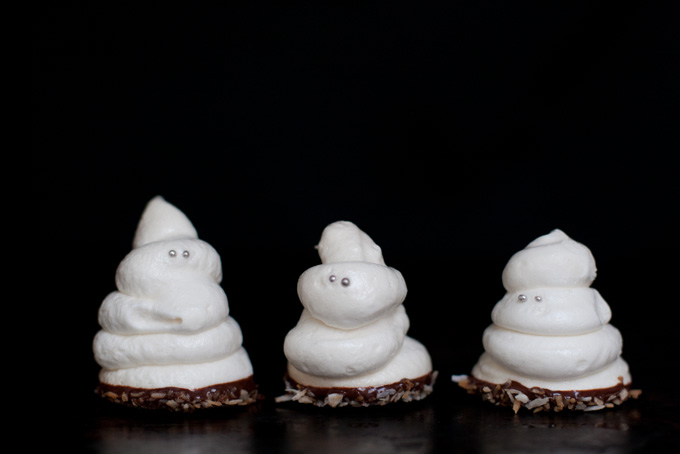
I like to fancy myself a chef at times. I see something tasty-looking, and suddenly inspiration hits-I can make that! Who cares if I don't have all of the ingredients or proper tools needed. Pssh! I can make it work. Well, over the past few days, this is what I have been doing. after seeing a delightful idea for Ghost Meringues, I naturally had to learn to make regular meringues. My sister, who can make a gourmet meal out of literally anything, insisted that it wasn't hard. With the thought of, "If
she can do it, so can I!" sounding in my head, I set about making them. I didn't have a whisk attachment for my stand mixer, so I borrowed one, assuming all Kitchen-aid mixers are created equal. Mistake number one. The perfect time to make my spooky creations seemed to be after my 4-month old was asleep, at 10:00pm last night. Mistake number two. With my overconfidence booming, I set about to make my
Ghosts.
 ' ' |
| Ghostly Meringues-too cute! |
I followed the recipe, and started assembling my ingredients. My egg whites needed to be room temperature, so I let them sit for 30 minutes before adding them to my mixing bowl. This is when I discovered that my whisk attachment wouldn't reach down to my eggs. This was a problem. I didn't particularly want to have to make meringue by hand, even though my sister had done it before me, so I set out 3 more eggs to warm up. After 30 minutes had elapsed, I discovered that I still didn't have enough egg whites in my bowl to use the mixer. This meant a lot of arm cramping was in my future. Fortunately, my wonderful husband was willing to assist in the egg white-beating duties, so my arm was spared the full torture it would have been doomed to endure. After we had achieved stiff peaks with our whites, it was time to add the sugar. One more attempt at using the mixer yielded similar results, so back to hand mixing we went. I had just used all of my granulated sugar the day before on some zucchini bread, but I had plenty of Demera sugar to use. I figured it would dissolve and taste just fine, not figuring on the brown color to play any part. Mistake number three. Now that the sugar was mixed in, it was time to start putting our meringues on pans to bake. As it was now about 11:30pm, we decided to skip piping the meringue out and instead spoon it out onto the parchment paper. I did the first tray, and my little meringues were about the size of an oddly-shaped ping-pong ball. My husband tired of playing with the meringue while I scooped, and decided to take his hand at spooning the meringue onto the paper. Lets just say, his blobs were a bit bigger than mine, and what the directions say they should have been. He also decided that we were going to have some ghosts after all, and started smearing meringue into some haunting shapes. In addition to our varying sized blobs, we also got two ghosts, a person, and a blob. (It was supposed to be a dog, but looked more like the letter N.) I decorated them with varying sprinkles, as well as pumpkin pie spice, and we were finished. Now, time for the baking. After waiting for them to bake, I finally got to turn off the oven and try one of our masterpieces (hehe, i'm exaggerating a wee bit here.) Upon inspection, I learned some things. Apparently, Demera sugar will in fact affect the color of meringues, as mine were now a lovely golden brown. Also, the bigger the blob, the more gooey it will stay. Chomping into one of my husbands monsters was like eating sweet cement. As it was well past midnight, I threw in the towel and went to sleep. After letting them sit in the oven overnight, I peaked again at the creations. Still brown, and the large ones were still cement-like. Oh well. Live and learn, right? I have realized that I now need an immersion blender since my mixer hates me, that shockingly, brown colored sugar will turn egg whites brown, and when in doubt, don't let the Hubby play with the meringues. Learning can be so much fun:)
 |
| My not so pale meringues. Not bad for so much improvising, I suppose. |


